Trader smart-contract
This tutorial will showcase the following topics:
Basic smart-contract to smart-contract call
Chain simulator setup for testing
Mainnet account cloning
The entire source code can be find in the MxOps github
Context
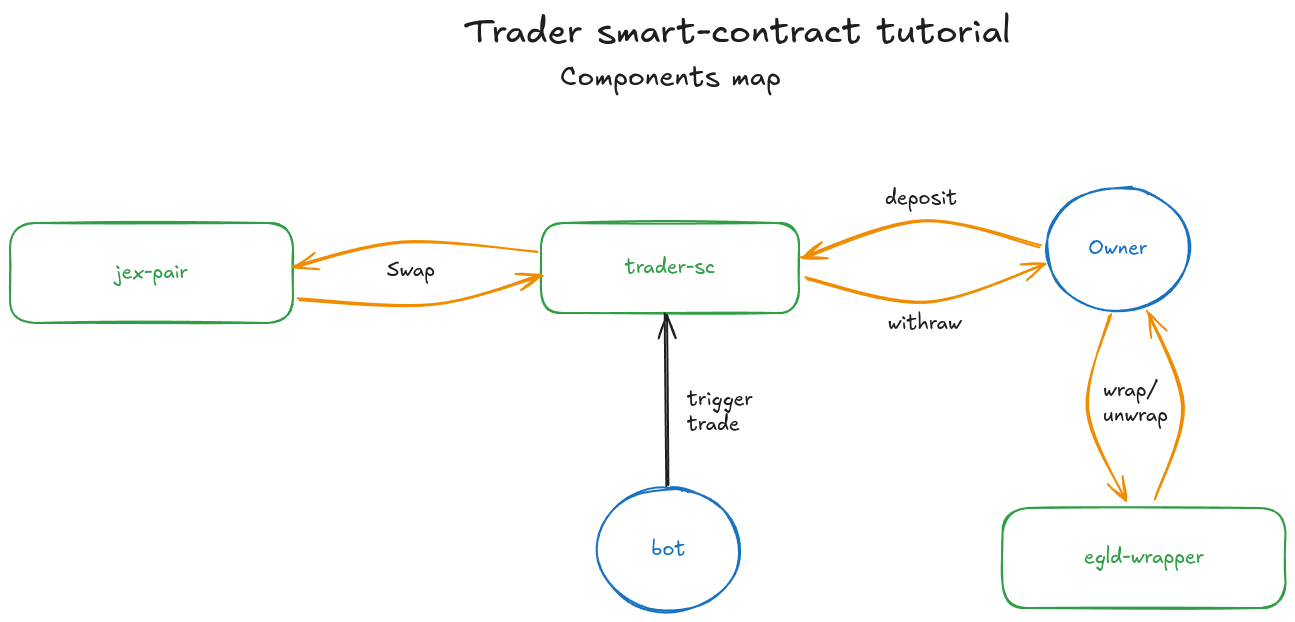
Let’s say we want to execute automated trading operations on MultiversX. As we want to secure our funds, the tokens will be held by a smart-contract, called trader-sc. An account controlled by a bot, will then send transactions to trigger the trader-sc into taking trade positions (buy or sell a token).
For the sake of our tutorial, our trader-sc will only interact will one pool, the JEX-WEGLD pair from Jexchange.
The image below sums up the different components of our project for this tutorial
The crucial point here is that we are dependent of a third party contract, the jex-pair from Jexchange, for which we don’t have the source code. We can always create a fake contract that emulate its interface, which would certainly help us to setup unit tests in Rust. This is already a good step but we will never have the insurance that our code works with the real jex-pair contract. Another solution could be to test our trader-sc on devnet, were jex-pair might be deployed, but this is a slow process and it is not robust. (lack of devnet funds, mismatch between devnet and mainnet contracts, …)
This is were the chain-simulator and the account cloning shines. The chain simulator is exactly like mainnet blockchain, expect that there is no consensus and that you can generate blocks at will. It is the perfect setup for on-chain testing.
So we will simply clone the entire jex-pair from mainnet, including the contract code, its storage, its tokens and its tokens roles (mint, burn, …) into the chain-simulator. This way, we will be able to test to our heart content our trader-sc with the real jex-pair.
Prerequisites
You will need to have the following installed:
MxOps: installation steps
Docker: installation steps
Rust and sc-meta: installation steps
Git: installation steps
Tutorial plan
trader-scdevelopment in rustchain simulator and accounts setup
trader-sctests on the chain simulator
To prepare for the tutorial, create a new folder
mkdir trader_sc_tutorial
cd trader_sc_tutorial
1. trader-sc development
We will not go too deep into the development of the contract itself, as it is not the purpose of this tutorial. Instead, we will highlight the main elements. If you want all the details, don’t hesitate to look at the source code.
Directly clone the trader-sc from its source code:
export MXOPS_SOURCE_BRANCH=main
git init
git remote add origin https://github.com/Catenscia/MxOps
git sparse-checkout set examples/trader/contract --no-cone
git pull origin $MXOPS_SOURCE_BRANCH
mv examples/trader/contract contract
rm -r examples
Now, let’s explain the main points of trader-sc.
1.A Storage and Init
Our contract needs to store several information:
the identifiers of the JEX and the WEGLD tokens
the address of the
jex-paircontractthe address of the bot that will be allowed to execute trade action
Thus, our contract will have the following storage
/// Holds the identifier of the JEX token used when trading
///
#[view(getJexIdentifier)]
#[storage_mapper("jex_identifier")]
fn jex_identifier(&self) -> SingleValueMapper<TokenIdentifier>;

/// Holds the identifier of the WEGLD token used when trading
///
#[view(getWegldIdentifier)]
#[storage_mapper("wegld_identifier")]
fn wegld_identifier(&self) -> SingleValueMapper<TokenIdentifier>;

/// Holds the address of the jex pair contract
///
#[view(getJexPairAddress)]
#[storage_mapper("jex_pair_address")]
fn jex_pair_address(&self) -> SingleValueMapper<ManagedAddress>;

/// Holds the address of the only account allowed to trigger trades
/// besides the owner
///
#[view(getExecutorAddress)]
#[storage_mapper("executor_address")]
fn executor_address(&self) -> SingleValueMapper<ManagedAddress>;
We will directly set up these values in the init function of our contract
/// Initialize the contract with all the storage values
#[init]
fn init(
    &self,
    jex_identifier: TokenIdentifier,
    wegld_identifier: TokenIdentifier,
    jex_pair_address: ManagedAddress,
    executor_address: ManagedAddress,
) {
    self.jex_identifier().set(jex_identifier);
    self.wegld_identifier().set(wegld_identifier);
    self.jex_pair_address().set(jex_pair_address);
    self.executor_address().set(executor_address);
}
1.B ExecuteTrade endpoint
This is the endpoint that will be called by the bot to trigger a trade. The bot will provide two arguments: if the trade is a buy or a sell order and the amount of input token. We will only execute market orders, meaning that we won’t require any minimum output token amount to receive.
The endpoint will return as a result the amount of token received from the swap.
/// EXECUTOR RESTRICTED
/// Execute a market order (no minimum output) on the JEX/WEGLD pair
///
/// ### Arguments
///
/// * **is_buy** - `bool`: if the contract must buy JEX tokens. Otherwise it will sell JEX tokens
/// * **input_amount** - `BigUint`: amount of input token to send
///
/// ### Returns
///
/// * `BigUint`: amount of output tokens received
///
#[endpoint(executeTrade)]
fn execute_trade(&self, is_buy: bool, input_amount: BigUint) -> BigUint {
    // check caller rights
    let caller = self.blockchain().get_caller();
    require!(
        caller == self.executor_address().get()
            || caller == self.blockchain().get_owner_address(),
        "Forbidden"
    );

    // figure out which token to send
    let input_identifier = if is_buy {
        self.wegld_identifier().get()
    } else {
        self.jex_identifier().get()
    };

    // swap
    let back_transfers = self
        .jex_pair_proxy(self.jex_pair_address().get())
        .swap_tokens_fixed_input(BigUint::zero())
        .single_esdt(&input_identifier, 0u64, &input_amount)
        .returns(ReturnsBackTransfers)
        .sync_call();

    // extract quantity of tokens received
    require!(
        back_transfers.esdt_payments.len() == 1,
        "Expect to receive 1 back transfer"
    );
    back_transfers.esdt_payments.get(0).amount
}
1.C Build
To use this contract, we need to build it.
sc-meta all build
If you look at the folder contract/outputs you will see the wasm code and the ABI of the trader-sc, which we will use later on.
2. Chain-simulator and accounts setup
2.A Chain-simulator
To start the chain-simulator and its entire stack (gateway, api, explorer, …), use the following command
mxops chain-simulator start
This will download and start the different docker containers needed to run the full chain-simulator stack. Once the setup is complete, you can open the chain-simulator explorer to check that everything is running. You should see that some transactions have already occurred.
2.B Contracts cloning
As we will use WEGLD, the ESDT wrapped version of EGLD, we need to clone the wrapper contract of mainnet, in addition to cloning the jex-pair contract.
First, create a data folder, and put inside the ABIs of the two contracts, we will need them later on as it will help MxOps to better interact with the contracts
mkdir data
curl https://raw.githubusercontent.com/Catenscia/MxOps/refs/heads/${MXOPS_SOURCE_BRANCH}/examples/trader/data/multiversx-wegld-swap-sc.abi.json > data/multiversx-wegld-swap-sc.abi.json
curl https://raw.githubusercontent.com/Catenscia/MxOps/refs/heads/${MXOPS_SOURCE_BRANCH}/examples/trader/data/jex-sc-dex-pair.abi.json > data/jex-sc-dex-pair.abi.json
create a new folder for the MxOps scenes, and the first file to clone the contracts from mainnet.
mkdir mxops_scenes
touch mxops_scenes/01_contracts_cloning.yaml
accounts:
  - account_id: egld_wrapper_shard_1
    address: erd1qqqqqqqqqqqqqpgqhe8t5jewej70zupmh44jurgn29psua5l2jps3ntjj3
    abi_path: ./data/multiversx-wegld-swap-sc.abi.json

  - account_id: jex_wegld_jexchange_pair
    address: erd1qqqqqqqqqqqqqpgq7u4y0qle773mcelvnkapjv36pn2whzy36avs2qccja
    abi_path: ./data/jex-sc-dex-pair.abi.json

steps:

  - type: AccountClone
    address: egld_wrapper_shard_1
    source_network: mainnet

  - type: ContractQuery
    contract: egld_wrapper_shard_1
    endpoint: getWrappedEgldTokenId
    results_save_keys:
      - wegld_identifier

  - type: AccountClone
    address: jex_wegld_jexchange_pair
    source_network: mainnet

  - type: ContractQuery
    contract: jex_wegld_jexchange_pair
    endpoint: getFirstToken
    results_save_keys:
      - jex_identifier
The upper part of this file is where we give ids to the wrapper and the jex-pair contracts to make it easier for us. We also provide the path of the ABIs of the two contracts.
After this, we define the MxOps steps, one by one:
- type: AccountClone
  address: egld_wrapper_shard_1
  source_network: mainnet
This step clone the wrapper contract from mainnet to the chain-simulator. Pretty simple isn’t it?
Later on, when we will interact with the WEGLD token, we could directly write its identifier (WEGLD-bd4d79). But that’s not robust and its prone to mistake. Instead, we will make a query to the wrapper contract we just cloned and we will save the WEGLD identifier in a variable:
- type: ContractQuery
  contract: egld_wrapper_shard_1
  endpoint: getWrappedEgldTokenId
  results_save_keys:
    - wegld_identifier
We then repeat repeat these two steps for the jex-pair:
- type: AccountClone
  address: jex_wegld_jexchange_pair
  source_network: mainnet

- type: ContractQuery
  contract: jex_wegld_jexchange_pair
  endpoint: getFirstToken
  results_save_keys:
    - jex_identifier
Let’s execute this scene in the chain-simulator:
mxops execute -n chain-simulator -s trader_sc_tutorial mxops_scenes/01_contracts_cloning.yaml
You should observe the output generated by the steps we defined in the scene
[2025-03-21 16:37:44,497 data INFO] scenario trader_sc_tutorial loaded for network chain-simulator [execution_data.py:827 in load_scenario]
[2025-03-21 16:37:44,497 scene INFO] Executing scene mxops_scenes/01_contracts_cloning.yaml [scene.py:150 in execute_scene]
[2025-03-21 16:37:44,528 setup steps INFO] Cloning account erd1qqqqqqqqqqqqqpgqhe8t5jewej70zupmh44jurgn29psua5l2jps3ntjj3 (egld_wrapper_shard_1) from mainnet [setup.py:354 in _execute]
[2025-03-21 16:37:45,077 smart contract steps INFO] Query getWrappedEgldTokenId on erd1qqqqqqqqqqqqqpgqhe8t5jewej70zupmh44jurgn29psua5l2jps3ntjj3 (egld_wrapper_shard_1) [smart_contract.py:355 in _execute]
[2025-03-21 16:37:45,087 smart contract steps INFO] Saving query results [smart_contract.py:339 in save_results]
{
    "wegld_identifier": "WEGLD-bd4d79"
}
[2025-03-21 16:37:45,088 smart contract steps INFO] Query successful [smart_contract.py:384 in _execute]
[2025-03-21 16:37:45,092 setup steps INFO] Cloning account erd1qqqqqqqqqqqqqpgq7u4y0qle773mcelvnkapjv36pn2whzy36avs2qccja (jex_wegld_jexchange_pair) from mainnet [setup.py:354 in _execute]
[2025-03-21 16:37:45,554 smart contract steps INFO] Query getFirstToken on erd1qqqqqqqqqqqqqpgq7u4y0qle773mcelvnkapjv36pn2whzy36avs2qccja (jex_wegld_jexchange_pair) [smart_contract.py:355 in _execute]
[2025-03-21 16:37:45,563 smart contract steps INFO] Saving query results [smart_contract.py:339 in save_results]
{
    "jex_identifier": "JEX-9040ca"
}
[2025-03-21 16:37:45,563 smart contract steps INFO] Query successful [smart_contract.py:384 in _execute]
2.C User accounts
We will need two user accounts, one for the owner and one for the bots. Ideally, we want these accounts to be on the shard 1, as this is the shard were the JEX-WEGLD pair is.
Create a new scene mxops_scenes/02_user_accounts.yaml, and write the three following steps:
generate two new accounts on the shard 1
give them 10 EGLD each
make the owner wrap 1 EGLD
steps:

  - type: GenerateWallets
    save_folder: ./wallets
    wallets:
        - owner
        - bot
    shard: 1

  - type: ChainSimulatorFaucet
    amount: 10000000000000000000  # 10 EGLD
    targets:
      - owner
      - bot

  - type: ContractCall
    sender: owner
    contract: egld_wrapper_shard_1
    endpoint: wrapEgld
    gas_limit: 5000000
    value: 1000000000000000000  # 1 EGLD
Execute this scene with the command below
mxops execute -n chain-simulator -s trader_sc_tutorial mxops_scenes/02_user_accounts.yaml
[2025-03-21 16:38:45,738 data INFO] scenario trader_sc_tutorial loaded for network chain-simulator [execution_data.py:827 in load_scenario]
[2025-03-21 16:38:45,738 scene INFO] Executing scene mxops_scenes/02_user_accounts.yaml [scene.py:150 in execute_scene]
[2025-03-21 16:38:45,757 setup steps INFO] Wallet n°1/2 generated with address erd10ukpjmvnmlf66jn33rp6rt6z9psxy5wwlscpk6cc84x8dmh230ssqxvnl4 at wallets/owner.pem [setup.py:86 in _execute]
[2025-03-21 16:38:45,763 setup steps INFO] Wallet n°2/2 generated with address erd1a8haqtmgnvzm9uctk0gfd7c24a30njmem2pspp7jddtlfm0a48vsleagm4 at wallets/bot.pem [setup.py:86 in _execute]
[2025-03-21 16:38:45,766 transactions steps INFO] Sending 10000000000000000000 eGLD from erd1cyv70xa6w3p8ck8kzhwsfad36tdwqvmn06c06pefzatr7d0snhyqu2h4t2 to erd10ukpjmvnmlf66jn33rp6rt6z9psxy5wwlscpk6cc84x8dmh230ssqxvnl4 [transactions.py:54 in build_unsigned_transaction]
[2025-03-21 16:38:46,472 base steps INFO] Transaction successful: http://localhost:3002/transactions/66d382beaead1d237c0ea12527e4407b2c37962bc8a318640b6c3a44b09a2dc1 [base.py:157 in _execute]
[2025-03-21 16:38:46,473 transactions steps INFO] Sending 10000000000000000000 eGLD from erd1cyv70xa6w3p8ck8kzhwsfad36tdwqvmn06c06pefzatr7d0snhyqu2h4t2 to erd1a8haqtmgnvzm9uctk0gfd7c24a30njmem2pspp7jddtlfm0a48vsleagm4 [transactions.py:54 in build_unsigned_transaction]
[2025-03-21 16:38:47,217 base steps INFO] Transaction successful: http://localhost:3002/transactions/c45ed3615a1e0834002ab4ba9c3b289f6097ba5c8a9b1be1615bdc02996d2e74 [base.py:157 in _execute]
[2025-03-21 16:38:47,219 smart contract steps INFO] Calling wrapEgld on erd1qqqqqqqqqqqqqpgqhe8t5jewej70zupmh44jurgn29psua5l2jps3ntjj3 (egld_wrapper_shard_1)  [smart_contract.py:241 in build_unsigned_transaction]
[2025-03-21 16:38:47,452 base steps INFO] Transaction successful: http://localhost:3002/transactions/5bb45234d30cc2569f6ec00852369b6eb4d8c6e9922e0dd9f570a1a336061737 [base.py:157 in _execute]
3. Deploy and test trader-sc
Now that the chain-simulator is set up, that we have cloned mainnet contracts and that we have created two user accounts with some funds, we are ready to deploy and test our trader contract!
3.A Deployment and deposit
Create a new scene mxops_scenes/03_deploy.yaml, that will have two steps:
deploy the
trader-sccontract by providing all the necessary argumentsmake the owner deposit 1 WEGLD to
trader-sc
steps:
  - type: ContractDeploy
    sender: owner
    wasm_path: contract/output/trader-sc.wasm
    abi_path: contract/output/trader-sc.abi.json
    contract_id: trader-sc
    gas_limit: 100000000
    arguments:
      - "%jex_wegld_jexchange_pair.jex_identifier"
      - "%egld_wrapper_shard_1.wegld_identifier"
      - "%jex_wegld_jexchange_pair.address"
      - "%bot.address"
    upgradeable: true
    readable: false
    payable: false
    payable_by_sc: true

  - type: ContractCall
    sender: owner
    contract: trader-sc
    endpoint: deposit
    gas_limit: 60000000
    esdt_transfers:
      - identifier: "%egld_wrapper_shard_1.wegld_identifier"
        nonce: 0
        amount: 1000000000000000000  # 1 WEGLD
Execute this scene with the command below
mxops execute -n chain-simulator -s trader_sc_tutorial mxops_scenes/03_deploy.yaml
[2025-03-21 16:42:16,816 data INFO] scenario trader_sc_tutorial loaded for network chain-simulator [execution_data.py:827 in load_scenario]
[2025-03-21 16:42:16,816 scene INFO] Executing scene mxops_scenes/03_deploy.yaml [scene.py:150 in execute_scene]
[2025-03-21 16:42:16,818 smart contract steps INFO] Deploying contract trader-sc [smart_contract.py:67 in build_unsigned_transaction]
[2025-03-21 16:42:16,819 execution accounts INFO] account erd10ukpjmvnmlf66jn33rp6rt6z9psxy5wwlscpk6cc84x8dmh230ssqxvnl4 is missing, reloading from scenario data [account.py:140 in get_account]
[2025-03-21 16:42:16,948 base steps INFO] Transaction successful: http://localhost:3002/transactions/91ba989066ee02b9187c0aa02fbf3267106118951569e4cfc6bee0695c6fdcbc [base.py:157 in _execute]
[2025-03-21 16:42:16,948 smart contract steps INFO] The address of the deployed contract trader-sc is erd1qqqqqqqqqqqqqpgqccmlnm2804rmapyvkv9x5dah8yt42gy730ss5zpltc [smart_contract.py:121 in _post_transaction_execution]
[2025-03-21 16:42:16,952 smart contract steps INFO] Calling deposit on erd1qqqqqqqqqqqqqpgqccmlnm2804rmapyvkv9x5dah8yt42gy730ss5zpltc (trader-sc)  [smart_contract.py:241 in build_unsigned_transaction]
[2025-03-21 16:42:17,133 base steps INFO] Transaction successful: http://localhost:3002/transactions/4e54d87d621724e963e5731cfb078adc69ea30f4883b0f423a090f0d1fb97075 [base.py:157 in _execute]
3.B Simple buy/sell test
Finally, everything is setup, we can test our contract and see if it can really interact well the the jex-pair contract of mainnet.
we will write a scene where the bot will trigger a buy order and then a sell order.
Currently, the contract only has 1 WEGLD, so we will first make it buy some JEX
Create a scene mxops_scenes/04_buy_sell.yaml.
steps:

  - type: ContractCall
    sender: bot
    contract: trader-sc
    endpoint: executeTrade
    arguments:
      - true  # buy
      - 500000000000000000 # 0.5 WEGLD to spend to buy JEX
    gas_limit: 20000000
    results_save_keys:
      - received_jex_amount
You can see that we asked MxOps to save the result of the function, i.e. the amount of jex token received from the swap into a variable. Indeed, for the sell order, we will simply ask out bot to sell half of what he just bought:
  - type: ContractCall
    sender: bot
    contract: trader-sc
    endpoint: executeTrade
    arguments:
      - false  # sell
      - "={%{trader-sc.received_jex_amount} // 2}" # resell half of what we have received
    gas_limit: 20000000
    results_save_keys:
      - received_wegld_amount
The format ={<formula>} tells MxOps that he will need to compute some formula, whereas the format %{<variable>} tells MxOps to look for a variable in the current scenario. ={%{trader-sc.received_jex_amount} // 2} is a combination of both formats.
Execute this scene with the command below
mxops execute -n chain-simulator -s trader_sc_tutorial mxops_scenes/04_buy_sell.yaml
[2025-03-21 16:43:42,274 data INFO] scenario trader_sc_tutorial loaded for network chain-simulator [execution_data.py:827 in load_scenario]
[2025-03-21 16:43:42,274 scene INFO] Executing scene mxops_scenes/04_buy_sell.yaml [scene.py:150 in execute_scene]
[2025-03-21 16:43:42,276 smart contract steps INFO] Calling executeTrade on erd1qqqqqqqqqqqqqpgqccmlnm2804rmapyvkv9x5dah8yt42gy730ss5zpltc (trader-sc)  [smart_contract.py:241 in build_unsigned_transaction]
[2025-03-21 16:43:42,276 execution accounts INFO] account erd1a8haqtmgnvzm9uctk0gfd7c24a30njmem2pspp7jddtlfm0a48vsleagm4 is missing, reloading from scenario data [account.py:140 in get_account]
[2025-03-21 16:43:42,658 base steps INFO] Transaction successful: http://localhost:3002/transactions/805adb8595f093c63ee727883ee7e76a39188efff4854864a70b55a52a1b284e [base.py:157 in _execute]
{
    "received_jex_amount": 6669341340637203805725
}
[2025-03-21 16:43:42,664 smart contract steps INFO] Calling executeTrade on erd1qqqqqqqqqqqqqpgqccmlnm2804rmapyvkv9x5dah8yt42gy730ss5zpltc (trader-sc)  [smart_contract.py:241 in build_unsigned_transaction]
[2025-03-21 16:43:43,084 base steps INFO] Transaction successful: http://localhost:3002/transactions/97e31b43ddcaff6bc58708eef45585286fd3bf01a8b5882268f0aee00115163a [base.py:157 in _execute]
{
    "received_wegld_amount": 248058588031531146
}
If you inspect the different links in the logs of your console, you will be inspect that your contract indeed interacted well with the jex-pair contract from Jexchange, mission accomplished! 🚀

3.C More testing
This is were this simple tutorial ends as we used a really simple contract for our trader. However you could add some conditions, more pools, more complex behavior and test of all this. You could also completely unbalance the Jexchange pool, or pause it and check that your contract handle this well.
The possibilities are endless, this was just an appetizer! If you need help for the tutorial or for your own project, don’t hesitate to contact us.
🏆 Conclusion
Congratulation, you learned how to setup a chain-simulator, clone contracts from mainnet and operate some on-chain tests for your contract!
This will surely come handy for you project! Do not hesitate to give us your feedback on this tutorial 🙌